At Home Dermaplaning!

wp-1484760688770.jpg

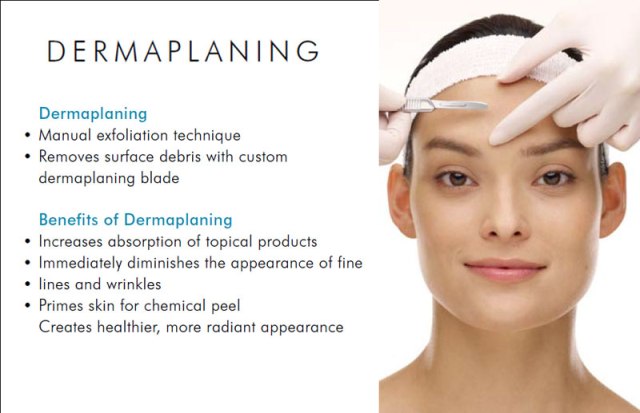
So by now you may or may not have heard of dermaplaning as the hot new facial service available to the stars…

For those of you who haven’t heard about it, here’s the skinny: dermaplaning is a service that consists of a skilled professional gently scraping a scalpel across the surface layer of the skin to physically exfoliate and also remove baby peach fuzz hairs to produce a super smooth effect and increase the power of skin treatments applied afterwards.

Generally speaking it’s not usually safe to take an unguarded blade to your own skin as it can be difficult to gauge pressure and it would be awful to end up with a scar instead of fresh skin.

wp-1484760688772.jpg

Well, for those of us out here who don’t want to spend a million dollars on facial treatments at a spa, I’m here to offer another option: guarded brow shaping razors for at home dermaplaning.

wp-1484760709280.jpgwp-1484760688769.jpg

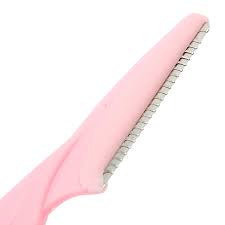
These are absolutely amazing in general and I use them for my brow shaping because my skin doesn’t do well with facial waxing. But the real awesome sauce about them is that they have a really sharp blade and they also have a micro guard on them that helps prevent the likelihood of cutting yourself accidentally.

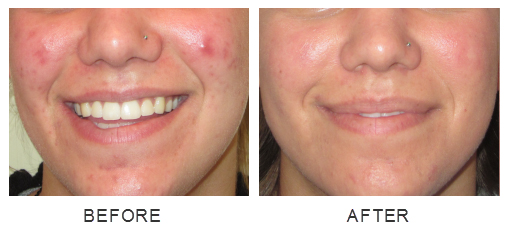
After reading about dermaplaning and doing some research I decided to give it a whirl myself. The major benefit for me has been how much better my skin care products seem to be working. By using a technique like this to physically remove the surface layer of dead cells and make-up residue that seems to never come off fully under usual circumstances it really does promote better absorption of masks and moisturizers.

It’s typically not necessary to do an extreme exfoliation technique like this every day. I suggest trying it once a week, or even once a month if you have sensitive skin. My skin is pretty hardy so I used to do this once a week until my skin got better, sometimes twice a week if I’ve been doing a lot of modeling shoots and classes and been wearing more make-up than I prefer. Now I’m back to once a month. It makes me feel so much cleaner to be able to get my skin under control.

This is a truly fabulous new addition to my skin care routine and I totally suggest it to anyone interested, just be careful not to shave off an eyebrow!


Advertisement

Toners, Fillers, and Fantasy Applications

img_20130916_135418.jpg

This is by far my favorite color theory visual I’ve ever worked with.


Color theory is often undervalued for coloring services but it comes into play heavily when working on corrective color applications, and even more so when working with fantasy applications.


Hairstylists have a pretty easy time explaining to clients the colors used to cancel out undesired undertones, and explaining the benefits of filler for preventing “hollow” colors. It’s harder to explain to clients that they can’t have lavender hair unless it can be made white first or else they’ll just have pastel brown.


Colors directly opposite of one another on the color wheel cancel each other out and create shades of brown (shown on the side of the chart). This information can be used to tone hair, or to accentuate tones.


The side labeled fillers consists of colors that exist as natural undertones when prelightening hair. If hair is lightened and needs to be dyed a natural shade that is darker then this pigment will need to be refilled first.


The side labeled toners is typically used to cancel out underlying pigment after hair is lightened. Green for red, blue for copper, violet for gold.


When doing fantasy color applications it’s important to keep this information in mind so you can get the results you’re looking for. Good luck everyone!

Some Notes on Wedding Hair

So it’s wedding season once again!

Don’t let wedding stress happen to you!

For hairstylists and brides alike this can be a stressful time so I’ve put together a list of things that can make all those hair interactions a little less crazed.


~8-12 weeks before the wedding: find a stylist and book the wedding date, your trial, possibly 2 trials, and map out color appointments and trims.

~4-6 weeks before the wedding: have your trial (with tiara, pins, veil, etc) and take final reference photos, make sure you have confirmed timing and number of people for services on day of.

~2-3 weeks before the wedding: do your color (if you normally color your hair) so that it has a little room to settle before the wedding, do your last trim before the wedding. Do NOT experiment with new color or cut this close to the wedding!


A few other notes:

-you want to look like yourself in photos, if you normally wear your hair a certain way use it as inspiration for your wedding hair, if you never wear it up in even a ponytail then maybe you don’t really want it all up for your wedding

-your hairstylist is likely to make more money at the salon than at your wedding so unless you’ve got the world’s biggest bridal party please bear in mind they are missing an entire 8 hour day to do 3 hours with you, often plus travel expenses, we love what we do, but please don’t assume tip is included in your total unless specifically stated

-typically it’s best for the bride to get her hair done second to last, you want to spend the morning “relaxing” as much as possible so make everyone else go first

-EXCEPT mother of the bride should be last, or in some cases the soon to be mother in law, these are people you want available to help run errands and be bullies to get things fixed, if they’re in a chair or already have their hair done they won’t be able to run around as much

Hotheads Hair Extensions, Makeover

I do hair extensions day in and day out, and I always love what I do, but sometimes I get a client in my chair who’s transformation still blows me away.

This client is a cancer survivor. Her hair had finally started to grow back in and she was visiting someone in California where she went to get her first ever set of hair extensions. They stylist ordered no where near enough hair, and then proceeded to remove much of the length from the hair, and then began cutting into her natural hair in an effort to blend in the additions.

We went through and removed all of her existing hair extensions, colored her hair to a more even base color, and then reapplied a very full head of Hotheads tape in hair extensions that we ordered just for her.

The end result is that you can’t even tell she has extensions! She was really happy with the end look and that made me feel all warm and fuzzy inside. This is why I do what I do.

photogrid_1456603758247.jpg

Cold Weather Hair Tips

woman-wearing-winter-hat-snowThe weather changes with each season, why would you expect the same routine to work year round? You may need to add, remove, or completely change the products and tools you use. Here’s some points to get you started:

Use More Leave-Ins

The weather is harsh and the cold can be detrimental by hiding how humid or dry the air is. Trust me, you need the extra love, especially if you’re blowdrying more often to avoid leaving with wet hair.

Use Softer Hold Products

Gels and mouses that hold firmly will dry feeling too stiff in cold weather, so go for a lighter hold when choosing products for fall and winter months. You can always tease or add a finishing spray.

Be Wary of Protein Heavy Products

Yes, usually it’s thought of as a good thing, but it may not be necessary to add extra proteins to the hair. Normally a product that is protein rich will protect damaged hair, but if there is no damage they can build-up and may make hair dull and brittle. Avoid these unless your hair is actually damaged. Cold weather is not forgiving to brittle hair.

Use More Conditioner

Get into the routine of using extra conditioner to counteract damaging cold weather. Simple. Use more, rinse thoroughly.

Seal With Oil or Silicone

Jojoba and almond oils will add shine, and coconut oil and shea butter are perfect for coarser hair types. Silicone also works well as a moisture barrier to keep your hair soft.

Seasonal Makeover, Autumn 2013, Part 3

20130825_13524420130825_135253 I know, I know. I’ve been slacking a bit on the posts recently, but it’s only because I’ve been busy doing fun stuff on people’s heads!

For this client we wanted to blend out a previous color root line and add noticeable length and some thickness using hair extensions. Her base cut was not changed dramatically, only a reshaping of the bangs/fringe area was done before the hair extensions were applied.

Working with her color it was key to take into account her upcoming schedule: she’s getting married in less than a year and wants it to be very blonde for that. 20130825_17220520130825_172143

In the meantime however, we wanted something more subtle. To achieve this look we added mid tone highlights using a high lift color and lowlights using a level 6 golden brown demipermanent color. Demi was used for the darker tone so it would fade out before we’d be coloring for her wedding. This reduces the amount of bleach we would require later, and helps prevent brassiness when it’s lightened again later. The result was a slight ombre effect that should blend in with minimal root for the Fall and Winter seasons.

We then applied hair extensions in multiple colors from So.Cap USA and DiBIasi. We used two brands to mimic the natural variation in textures on her own hair, some being fine and some being ultra fine. There are dark and light hair extensions added but we tried to keep the balance heavier on the blondes to bring some more brightness to her look.

This was definitely a fun one, it’s not often I get the opportunity to fully double someone’s length!

You’re gorgeous and I can’t wait to see you in my chair again, hunny!

Seasonal Makeover, Autumn 2013, Part 2

20130825_13160920130825_15405120130825_154040


For this client we wanted to do something a bit more subtle. With a family wedding just a few weeks away we wanted something that would feel brighter and richer without being so different that roots would be visible in pictures from the event.

We started by taking a look at her natural hair. She had no coloring services on her hair so we used the sun lightened ends of her hair as our target colors for her highlights. Her hair tends to take on a golden/cinnamon color so we applied a slightly redder tone on the highlights throughout the sides and a more golden toned color for the highlights through the crown area.

The color result was augmented by slight changes to her hair cut as well. By adding more layers, especially at the front, we were able freshen the layers framing her face and show off our new color better.

The only styling product used on her hair was “It’s a 10” leave-in conditioner. Her hair was blowdried out with a round brush and then touched up with a flat iron for

additional smoothing and control shaping.

Hope this was a fun inspiration for some of you to show that makeovers don’t have to be big to fun. Enjoy the weather!

Seasonal Make Over, Autumn 2013

20130825_101231I’m absolutely loving the cooler weather approaching, and along with it comes all the beautiful reds/browns/brondes! This was a wonderful makeover I got to do on one of my favorite clients. (I promise, you’re all my favorites.)


Our starting point was a level 5 dye over pre-existing highlights underneath, so I knew there could be some variation if we tried doing a very full highlight pattern. Instead, we opted to highlight just around the face in a “Victoria’s Secret” style pattern. We used a very low volume lightener and then toned with a golden blonde.


Once her natural hair was prepped to the desired colors we began the hair extension application. We used fusion hair extensions from multiple companies to get all the colors we were looking for. We applied a base of natural brown extensions, adding red and gold ombre pieces throughout the front and lower layers of her hair. The result was a stunning Autumnal blend of colors and gorgeous all over length.


I always love being able to really create and build new looks for my clients, and I’m particularly happy with this one!


20130825_125255 20130825_125302 20130825_125308 20130825_125331

Bronde: The Perfect Transitional Color

18_medium-brown-hair-2013A lot of us are holding onto Summer season but as September draws closer we are forced to admit Autumn will soon be upon us. Many people choose to change their hair coloring or style with season changes and as a hairstylist changing is one of my favorite things to do.


What direction to adjust hair color though? Bronde. It’s only a sort of made up word. Halfway between blonde and brown lies bronde. A beautiful tone that compliments almost everyone. It’s a personal favorite of mine for Autumn because it’s warm and vibrant without being over the top.


If you’re currently a blonde: ask your stylist for some chocolate lowlights and a honey wheat colored toner. This will add depth and richness to your hair without giving you an overall dark color.


If you are currently a brunette: ask your stylist for some face framing highlights in a caramel tone, and if you’re really dark ask for some tawny or bronze low/highlights to break it up further. More colors helps avoid stripes.


If you are currently a red head: okay, yes this is a trickier color for you to get to, and I recommend using it more as inspiration than actually copying it. To get a similar feeling without sacrificing your luscious red you could ask for amber or copper highlights to kick up some brightness, and/or mahogany or chestnut lowlights to bring more depth.

Current Obsession: Hippie Hair

Beachy-CurlsBig, beautiful, beachy hair is what I’m into right now.

I’m loving this mid-tone look, it’s got a slight ombre feel to it, and the head band really accentuates the texture.

To get a look like this I recommend braiding your hair overnight if your hair isn’t already textured. Once it’s fully dried you can finger comb through it to rough it up. To get a really messy feeling you can even run a spray wax or salt spray through it as well.

If your hair isn’t long enough for this then hair extensions may be a great option for you. If you’re considering wearing a look like this only occasionally then clip-in hair extensions would be a wonderful option. If you’re like me though, and want to do as little work as possible each morning, then something more long term might work better. Fusion hair extensions or tape-in hair extensions have more staying power and allow you to sleep with your long hair in. This means waking up ready to go.

If you’re going to be rocking a hairstyle like this then i suggest leaving your make-up more minimal. Big hair shouldn’t be competing with bright lipstick, or overly dramatic eyes. Balance is the key to looking like a fashion plate and not like an overzealous clown.